
Clinical Exercise: Caudal Epidural
Scenario:
You have been referred a patient who has chronic lower back pain with no evidence on radiological scans of any major damage or abnormalities in that region.
Diagnosis/Considerations:
Since the patient has no indication of structural injury coupled with chronic pain you conclude that there may be a 'run-away' inflammatory reaction.
You propose to the patient a series of anti-inflammatory steroid injections coupled with physiotherapy to strengthen their lower back.
Mechanism:
The nerve roots transit through the epidural space before traveling into the lower extremities. In some cases of lower back pain these roots become inflamed due to irritation from an injured disk or bone spur (in many cases these can be too small to see on radiology leaving pain symptoms without a surgical intervention target).
An epidural injection places the anti-inflammatory steroid (typically cortisone) into the epidural space immediately around the nerve roots. By reducing inflammation the treatment can promote healing and possibly speed up natural recovery from chronic pain by allowing the inflamed tissue to reorganize.
In most people pain relief and improvement in symptoms occurs within 3-7 days providing either permanent relief or a window of opportunity for additional treatments such a physiotherapy to be used. In the case of a series, three epidural injections 2-4 weeks apart are used in order to give time to perform physiotherapy.
Epidurals are also often used to provide local anesthesia for surgery, these can be caudal (as performed here) or lumbar in target (more commonly for local anesthesia).
Treatment (perform these steps on the donor in a mock-procedure):
PREPARATION: Send a member of your team to the instrument supply tables to fetch a 20 gauge syringe and several needles. The needle should remain usable through several uses, however if the needle becomes blunt due to repeated impact with bone send a team member to obtain a new needle.
Note: We will perform the procedure with the skin reflected away from the sacrum. In the donor, increased skin density due to embalming makes palpation and positioning artificially difficult compared to the living.
1) Open the syringe packet and aspirate some wetting agent or water (suction through the front with the plunger).
2) Open the needle package and observe that the syringe needle is cased in a protective sheath.
3) Place the needle still in the protective sheath onto the syringe, locking it in place with a twisting motion into the threads on the syringe.
This is a luer-lock, the most stable and common type of syringe to needle join in use.
4) Pull the protective cap from the needle.
CAUTION: exercise care when handling needles to prevent impaling yourself or a colleague. Needle-stick injury is the leading cause of accidental blood-borne pathogen infection in hospital staff.
5) Holding the needle upright, give several sharp taps to the side of the syringe to displace any bubbles such that they rise to the top.
6) Depress the plunger sufficient to push out any air bubbles from the syringe and needle.
It is critical with injections to ensure that you do not also inject an air bubble. This can cause irritation in subcutaneous injections and in the case of intravenous injection could result in an air embolism.
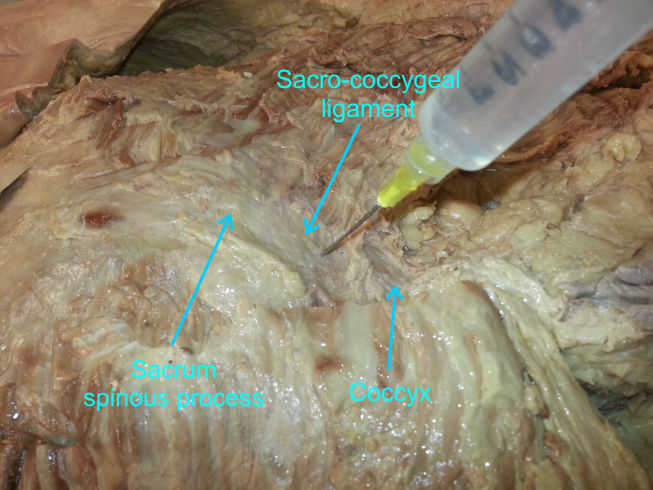
7) Palpate for the tip of the coccyx and for the rudimentary spinous protuberances at the midline of the sacrum.
The sacral hiatus is typically about the distance from the tip of the index finger to the proximal inter-phalangeal joint (knuckle) and slightly inferior to the last spinous protuberance of the sacrum.
8) At the location of the sacral hiatus, place the tip of the needle at approximately 45 degree angle and insert.
In the living, a distinct 'click' will be felt as the sacro-coccygeal ligament is pierced. This may be less distinct in a donor...when you hit bone you're gone all the way through the membrane!
9) Lower the angle of the needle such that it is approximately parallel to the sacrum pointing towards the head.
This position is often called the cephalad direction.

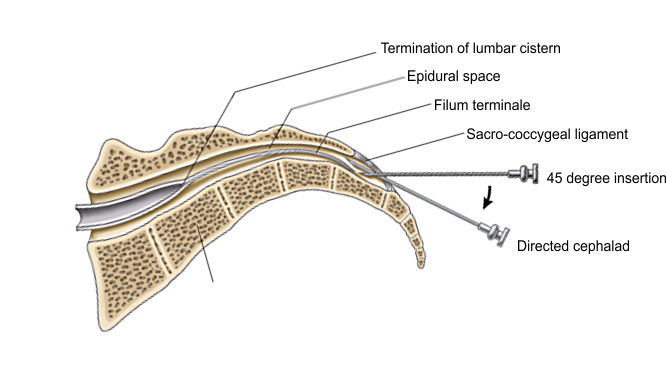
10) Gently insert the needle the full length.
In the living you do not insert beyond the tip, however in the donor we will insert the full length to appreciate the access the sacral hiatus provides to the epidural space.
If you are in the perfect position the needle will insert easily, if you are incorrectly aligned the needle will bump bone. In that case pull back and try a slightly different angle.
11) Inject some of the wetting agent/water.
If you look into the laminectomy opening you have in the lower back, a perfectly positioned injection will result in fluid flowing into the spinal region exposed by the laminectomy.
Each member of your team should have the opportunity to try an injection. The needle should remain usable through several attempts, however if you accidentally bend the needle do not attempt to straighten or replace that needle. Instead, fetch a replacement syringe and needle from the supply table and discard the bent needle/syringe assembly.
NOTE: when finished the procedure ensure that the syringe and attached needle
are collected in one of your trays and transported to the sharps containers for
disposal.
Do not attempt to re-cap a needle - Re-capping is a leading
cause of needle-stick injury.
Never transport needles by hand - Always transport entire
syringe/needles in a tray.
Outcome:
The steroid injection occurs perfectly and at follow-up 5 days later the patient reports nearly complete alleviation of the pain. You recommend starting the physiotherapy and refer the patient to the physiotherapist to begin exercises to strengthen the lower back.